Now, I know it isn’t Monday today, or even Tuesday but I’m a bit behind on this week, so please forgive me while I catch up. To kick start my Me-Made-May Challenge I’ve decided to start a new weekly feature on my blog called “Mending Monday,” which, with the exception of today, as the title suggests, will be published once a week on a Monday. This feature has been on the agenda for a while and my “to-fix” pile has been slowly growing, so Me-Made-May has given me the perfect excuse to kick-start it. These are the pieces I’ll be mending in the next few weeks:
 I’ll be sharing a different mend or alteration with you and a step-by-step tutorial of how I did it. So, to get started, I have been a fan of mint green for a long time and I’ve recently been wearing it quite a bit. So my first piece just had to be this vintage c. 1980s mint green and white pleated skirt I got in the TRAID sale a couple of months ago (for £2!!). I thought it would be perfect for spring/summer. It fits me
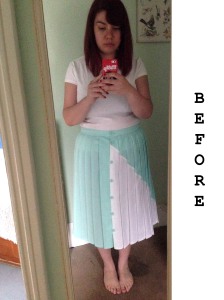
comfortably on the waist and I love the assymetric line created by the contrasting fabric but it was much to long and looked a bit dowdy. I’m not one for wearing super short skirts though, so I wanted it about knee length. It’s always much harder to get an accurate idea of how much you need to shorten something without assistance but with no minions to hand, I had to make do.
I put the skirt on and made sure it was sitting at a comfortable position at my waist and pinned up a small section at the front, roughly where I wanted the skirt to finish (above my knee). I then took the skirt off to continue pinning a larger section at the front (about 8 inches) to give myself a better idea of how it would look and put it on again with the hem pinned up to make sure I was happy. To work with the existing button positioning (I always try to make life as easy as possible for  myself) I decided to stop just above the closest button which would allow enough hem allowance for the hem to sit in a natural place below the final button.
After I had decided on the length, I took the skirt off and measured how much it had been turned up. Again, it’s best to round off to the nearest whole or half cm to make your life easier! Mine was 13cm. Remember, this includes your hem allowance, so if you take this off you’re left with the amount you need to cut off from the bottom. I usually look at the size of the exisitng hem and keep it the same. This one was 1.5cm.
So the amount I needed to remove was 11.5cm. To make sure to measure and cut a straight edge, I temporarily flattened out the pleats. The best way to do this is to use some kind of a weight. With two little tea pots to hand, these worked pretty well. You could use some unopened food tins if you don’t have an y weights. I opened the pleats and put a weight top and bottom, working in about arms length sections, moving my weights as I went along. With my tape measure and a piece of contrast coloured chalk I made straight marks every few inches at this measurement using the brass end of the tap measure as a ruler.
Once this was marked, I cut off the short piece making sure my sheers were cutting to the right edge of my chalk marking. As my skirt has a button-down front, the button stand was stitched down along the edge so I unpicked a few stitches to make this flat so I could neaten the edge. I set up my sewing machine with a smallish zig zag and tested it on the piece of fabric I had cut off, to check the tension. As a rule, the best tension for a zig zag stitch is slightly loosened (so the needle thread shows slightly on the wrong side) but it should look even on top with none of the bobbin thread showing. Adjust your tension according to your fabric. As you are stitching onto a single layer (as opposed to a double layer) you may find the zig zag drawing your fabric in at the centre and creating a slight channel. To avoid this, I make sure the needle has enough room to spread across the fabric and to do this, stitch the zig zag in about 0.5cm from the edge. After doing this, I trimmed the edge back to the zig zag to get a neater finish.
 After my edge was neatened and trimmed, I knew I had 1cm left to play with. Now it was time to press up my hem. As I was going to do a blind hem, I only wanted to turn it up a single layer. With the right side of the fabric facing down, starting from one of the ends I measured up 1.5cm and pinned this up all the way along the hem and pressed with the pleats creased (not flattened out). Note, I used glass head pins so was able to press over these but if you’re using pins with plastic heads, make sure you remove them as you go and be very careful not to place the iron plate over any or they will melt and ruin your iron!
Once the hem was pressed I buttoned up the fron to make sure it matched. I made a slight adjustment because the mint green side was slightly longer. As I had a button hole on the back of the white (top) side I had to shorten the mint side to level it out as I wasn’t able to make the white side any longer or the buttonhole would show. Once I had evened out the hem, I had to make the adjustment gradual to blend into the rest of the hem allowance so it wasn’t a steep change, making it less noticeable.
Once this was done, I also pinned the pleats and pressed these in and tried the skirt on to check it looked balanced (and not longer or shorter at any point. )
Finally, I used a needle and thread, about an arms length at a time to avoid knots and did a blind hem stitch. Instead of knots I secure at the beginning and end of the thread with a couple of small stitches on top of each other. With all the pleats it took me nearly an hour (while catching up on some TOWIE) but it was worth it. I gave it a final press making sure the pleasts are pressed back nicely into shape.
 I’m really happy with the results and just need a sunny day this week to wear it. I may also add a lining to this skirt as trying it on with a white tee made me realise how sheer it is. Would you be interested in a tutorial on this? With all the rain today, I’ve decided to work on shortening a Four Seasons mac (another charity shop find.) Look out for that next week! Hopefully I’ll have better pics!
Daisy x

Oooh, gorgeous skirt, I LOVE the mint colour. I’m a newbie sewer and a VERY slow learner, so Me Mended May sounds like a more manageable version of Me Made May – just until I gear up to making actual real-life wearable clothes 😀 Thanks for the inspiration!
Hey Sarah, Oooh I love the Me Mended May idea! Might have to use that as my new hashtag! Can you share some of your mends? Do you use instagram? I’m starting a mending club soon which would have been perfect for you if you were still in London.. Thanks for the lovely comment. Glad you’ve been inspired. I hope to see some of your mends soon!